


Want to save this recipe?
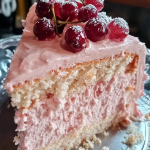
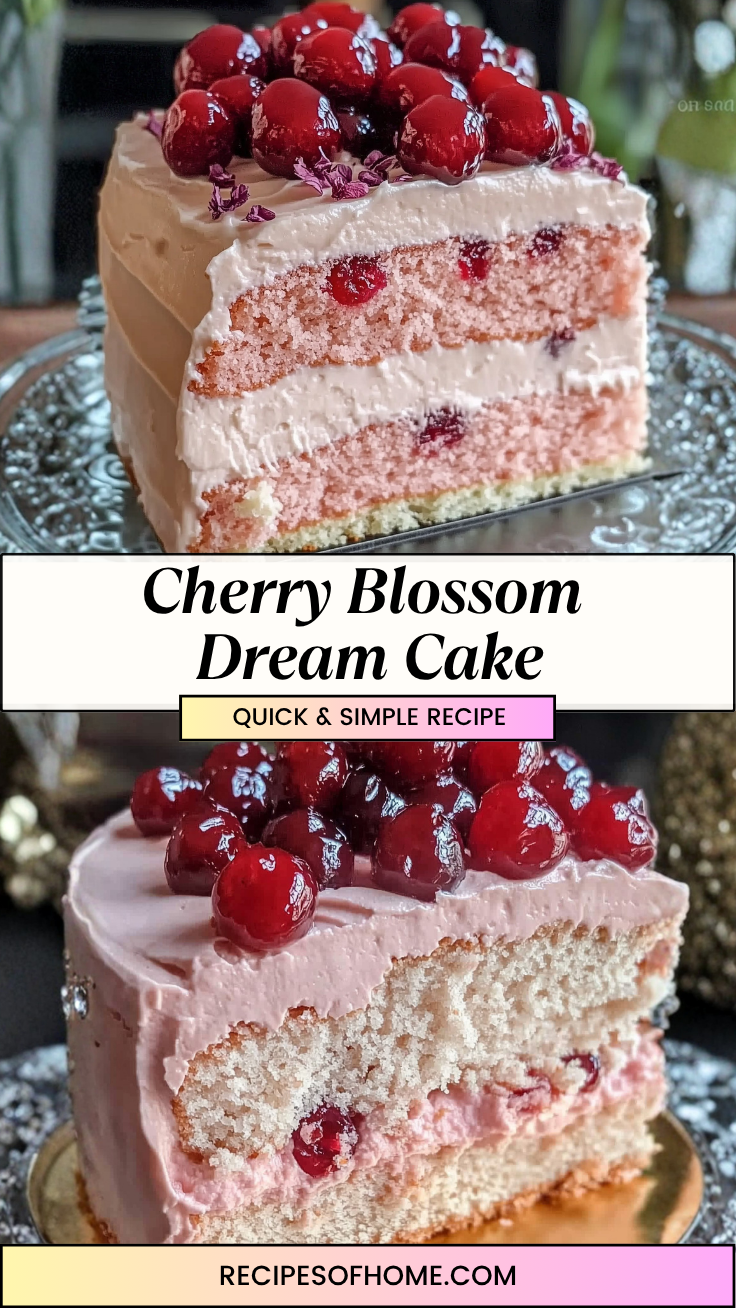
The delicate, sweet scent of warm vanilla mixed with a bright hint of sweet cherry wafting through the house always brings a festive cheer to our kitchen. This Cherry Blossom Dream Cake is a recipe I created for special family celebrations, but it has quickly evolved into a weekend favorite whenever we need a spectacular treat. Its vibrant pink hue and cloud-like layers make it look like a stunning creation from a high-end boutique bakery, yet it’s entirely approachable to make at home.
Every forkful offers an incredibly plush, tight crumb that remains remarkably tender, sandwiched between layers of silky, rich cherry-infused buttercream frosting. It strikes the perfect balance between nostalgic comfort and elegant presentation. Serving a giant slice of this beautiful cake to my husband and kids on a sunny afternoon brings instant smiles. It’s the ultimate showstopper dessert for spring birthday parties, baby showers, or just a sweet way to brighten up a simple Sunday family dinner.
Why You’ll Love It
- Stunning natural aesthetic: The beautiful pastel pink color makes it an instant visual centerpiece for any celebration dessert table.
- Incredibly moist crumb: The inclusion of real buttermilk in the cake batter ensures the layers stay velvet-soft for days.
- No complex decorating required: A simple rustic sweep of the pink buttercream frosting creates an effortlessly elegant finish.
- Kid-approved fruit flavor: The gentle, sweet-tart cherry notes provide a fun twist that both children and adults absolutely adore.
- Fabulous for making ahead: The structural integrity of the cake layers actually improves after chilling, saving you stressful party-day prep time.

Ingredient Notes & Details
- Buttermilk: The secret weapon for an ultra-tender crumb. The natural acidity breaks down the gluten strands, keeping the layers beautifully soft and plush.
- Maraschino cherry juice: Injected directly into both the cake batter and the frosting to provide that signature pink color and vintage cherry sweetness.
- Cake flour: Provides a lighter, finer texture than traditional all-purpose flour, allowing the layers to rise high and fluffy.
- Unsalted butter: Forms the rich, creamy foundation of our luxurious buttercream icing. Ensure it’s fully softened at room temperature.
- Glace cherries: Placed elegantly across the top layer to give a glossy, beautiful texture and a concentrated burst of fruit flavor.
Natural Substitutions: If you want to skip the maraschino juice, you can use a concentrated natural tart cherry juice reduction combined with a drop of natural beet juice for that vibrant pink coloring. Swap the buttermilk with an equal amount of whole milk mixed with one tablespoon of fresh lemon juice. For a gluten-free modification, a 1:1 gluten-free baking flour blend containing xanthan gum performs brilliantly.
Step-by-Step Instructions
We begin by creaming the softened unsalted butter and granulated sugar together in a large bowl until the mixture turns exceptionally pale, light, and fluffy. This step is critical because it traps vital air pockets within the fat, giving the cake layers their signature cloud-like rise. Next, beat in the eggs one at a time, followed by a generous splash of vanilla extract and our bright maraschino cherry juice, whisking until smooth and uniform.
In a separate bowl, sift together the cake flour, baking powder, and salt. Alternately fold the dry ingredients and the buttermilk into your wet butter mixture using a rubber spatula. This alternating method prevents the batter from curdling and ensures the liquid is perfectly absorbed without over-working the flour. Divide the beautiful pink batter evenly between your lined cake pans and bake until a toothpick inserted into the center comes out clean. While the layers cool, beat your softened butter and powdered sugar with a splash of cherry juice into a smooth, pipeable frosting, then assemble the layers with a generous spread of icing in between.
Expert Tips
- Level your layers: Use a serrated knife to slice off any domed tops from your cooled cake layers before frosting to ensure a perfectly stable stack.
- Chill before slicing: Pop the fully assembled and frosted cake into the refrigerator for thirty minutes to let the buttercream firm up for pristine slices.
- Sift the powdered sugar: Always sift your confectioners’ sugar before making the frosting to prevent stubborn little lumps from ruining your smooth finish.
- Don’t overbake the layers: Keep a close eye on the oven around the twenty-four-minute mark; overbaked cake flour can quickly turn dry.
- Apply a crumb coat: Spread a very thin layer of icing over the entire cake and chill it for fifteen minutes to lock in crumbs before finishing your final frosting layer.
Storage & Reheating
Because of the fresh buttercream, store any remaining cake slices in an airtight container or a covered cake dome in the refrigerator for up to 5 days. For the absolute best flavor experience, let your slice sit on the kitchen counter for 20 minutes before serving to allow the butter in the cake and icing to soften back up to its melt-in-your-mouth texture.
Serving & FAQs
This whimsical pink cake pairs spectacularly with a chilled glass of sparkling rosé for the adults, a cold glass of milk for the kids, or a soothing cup of jasmine green tea.
Can I use frozen cherries on top instead of glace cherries? Frozen cherries will thaw and leak dark juice all over your beautiful pink frosting. It’s best to stick with well-drained glace or maraschino cherries for decorating.
Why did my cake layers turn out dense and flat? This usually happens if the butter and sugar weren’t creamed long enough to incorporate air, or if your baking powder has expired and lost its lifting power.
Homemade Cherry Blossom Dream Cake
Prep time: 28 minutes Cook time: 26 minutes Total time: 54 minutes Servings: 12 slices
Ingredients
For the Cake Layers:
- 1 cup unsalted butter, softened to room temperature
- 1 ½ cups granulated sugar
- 3 large eggs, room temperature
- ¼ cup maraschino cherry juice
- 1 teaspoon vanilla extract
- 2 ½ cups cake flour
- 2 ½ teaspoons baking powder
- ½ teaspoon salt
- ¾ cup buttermilk, room temperature
For the Cherry Buttercream:
- 1 cup unsalted butter, softened
- 4 cups powdered sugar, sifted
- 3 tablespoons maraschino cherry juice
- ½ teaspoon vanilla extract
- ½ cup glace cherries for topping
Instructions
- Preheat your oven to 350°F (175°C). Grease two 8-inch round cake pans and line the bottoms with parchment paper rounds.
- In a large bowl, beat the softened butter and granulated sugar together for 4 minutes using a stand mixer or hand mixer until pale and fluffy.
- Add the eggs one at a time, beating thoroughly after each addition.
- Stir in the maraschino cherry juice and vanilla extract until completely incorporated.
- In a medium bowl, whisk together the cake flour, baking powder, and salt.
- Turn the mixer to low and alternately add the dry flour mixture and the buttermilk to the wet ingredients in three additions, beginning and ending with the flour. Mix just until combined.
- Divide the pink batter equally between the two prepared cake pans and smooth the surfaces with a spatula.
- Bake for 25 to 28 minutes, or until a toothpick inserted into the center of the layers comes out clean.
- Allow the cakes to cool in their pans for 10 minutes, then invert them onto wire cooling racks to cool completely to room temperature.
- To make the frosting, beat the softened butter for 2 minutes until creamy. Gradually add the sifted powdered sugar, cherry juice, and vanilla extract, beating on high speed for 3 minutes until light and fluffy.
- Place the first cooled cake layer on a serving platter, spread a thick layer of frosting over the top, and stack the second layer cleanly on top.
- Frost the top and sides of the entire cake with the remaining buttercream, then garnish the top surface with the glossy glace cherries before slicing.
Leave a Reply