


Want to save this recipe?
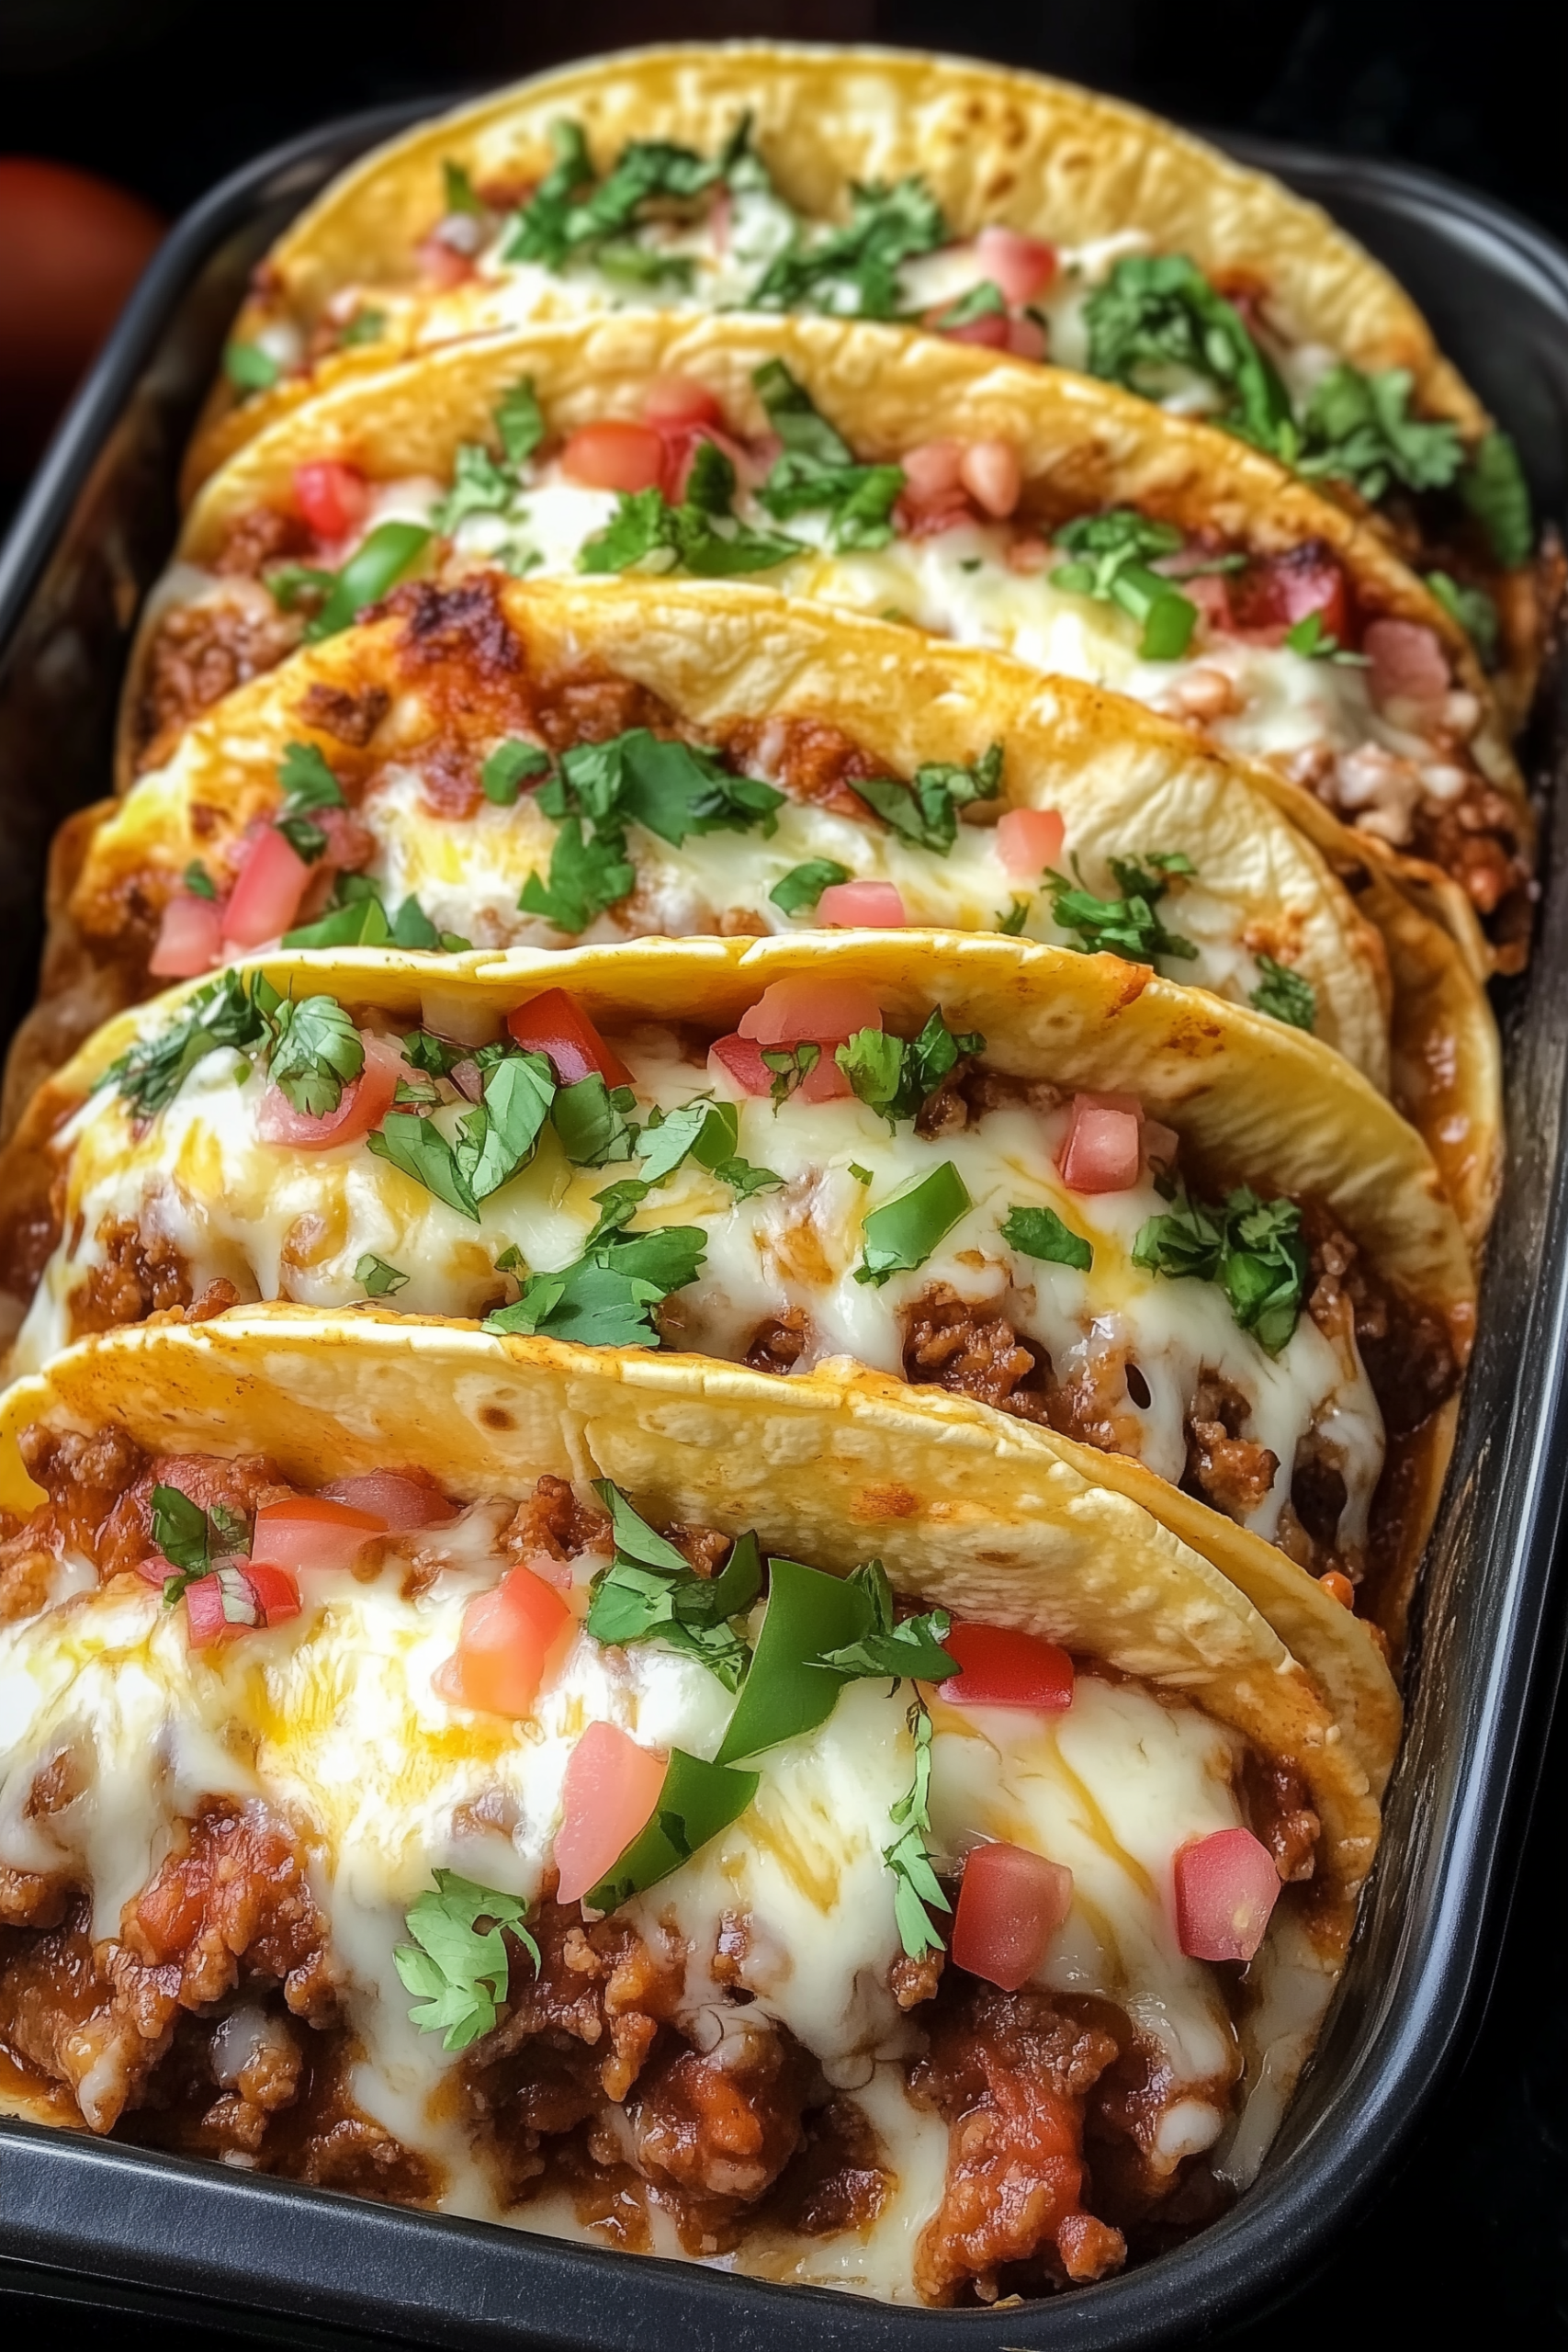
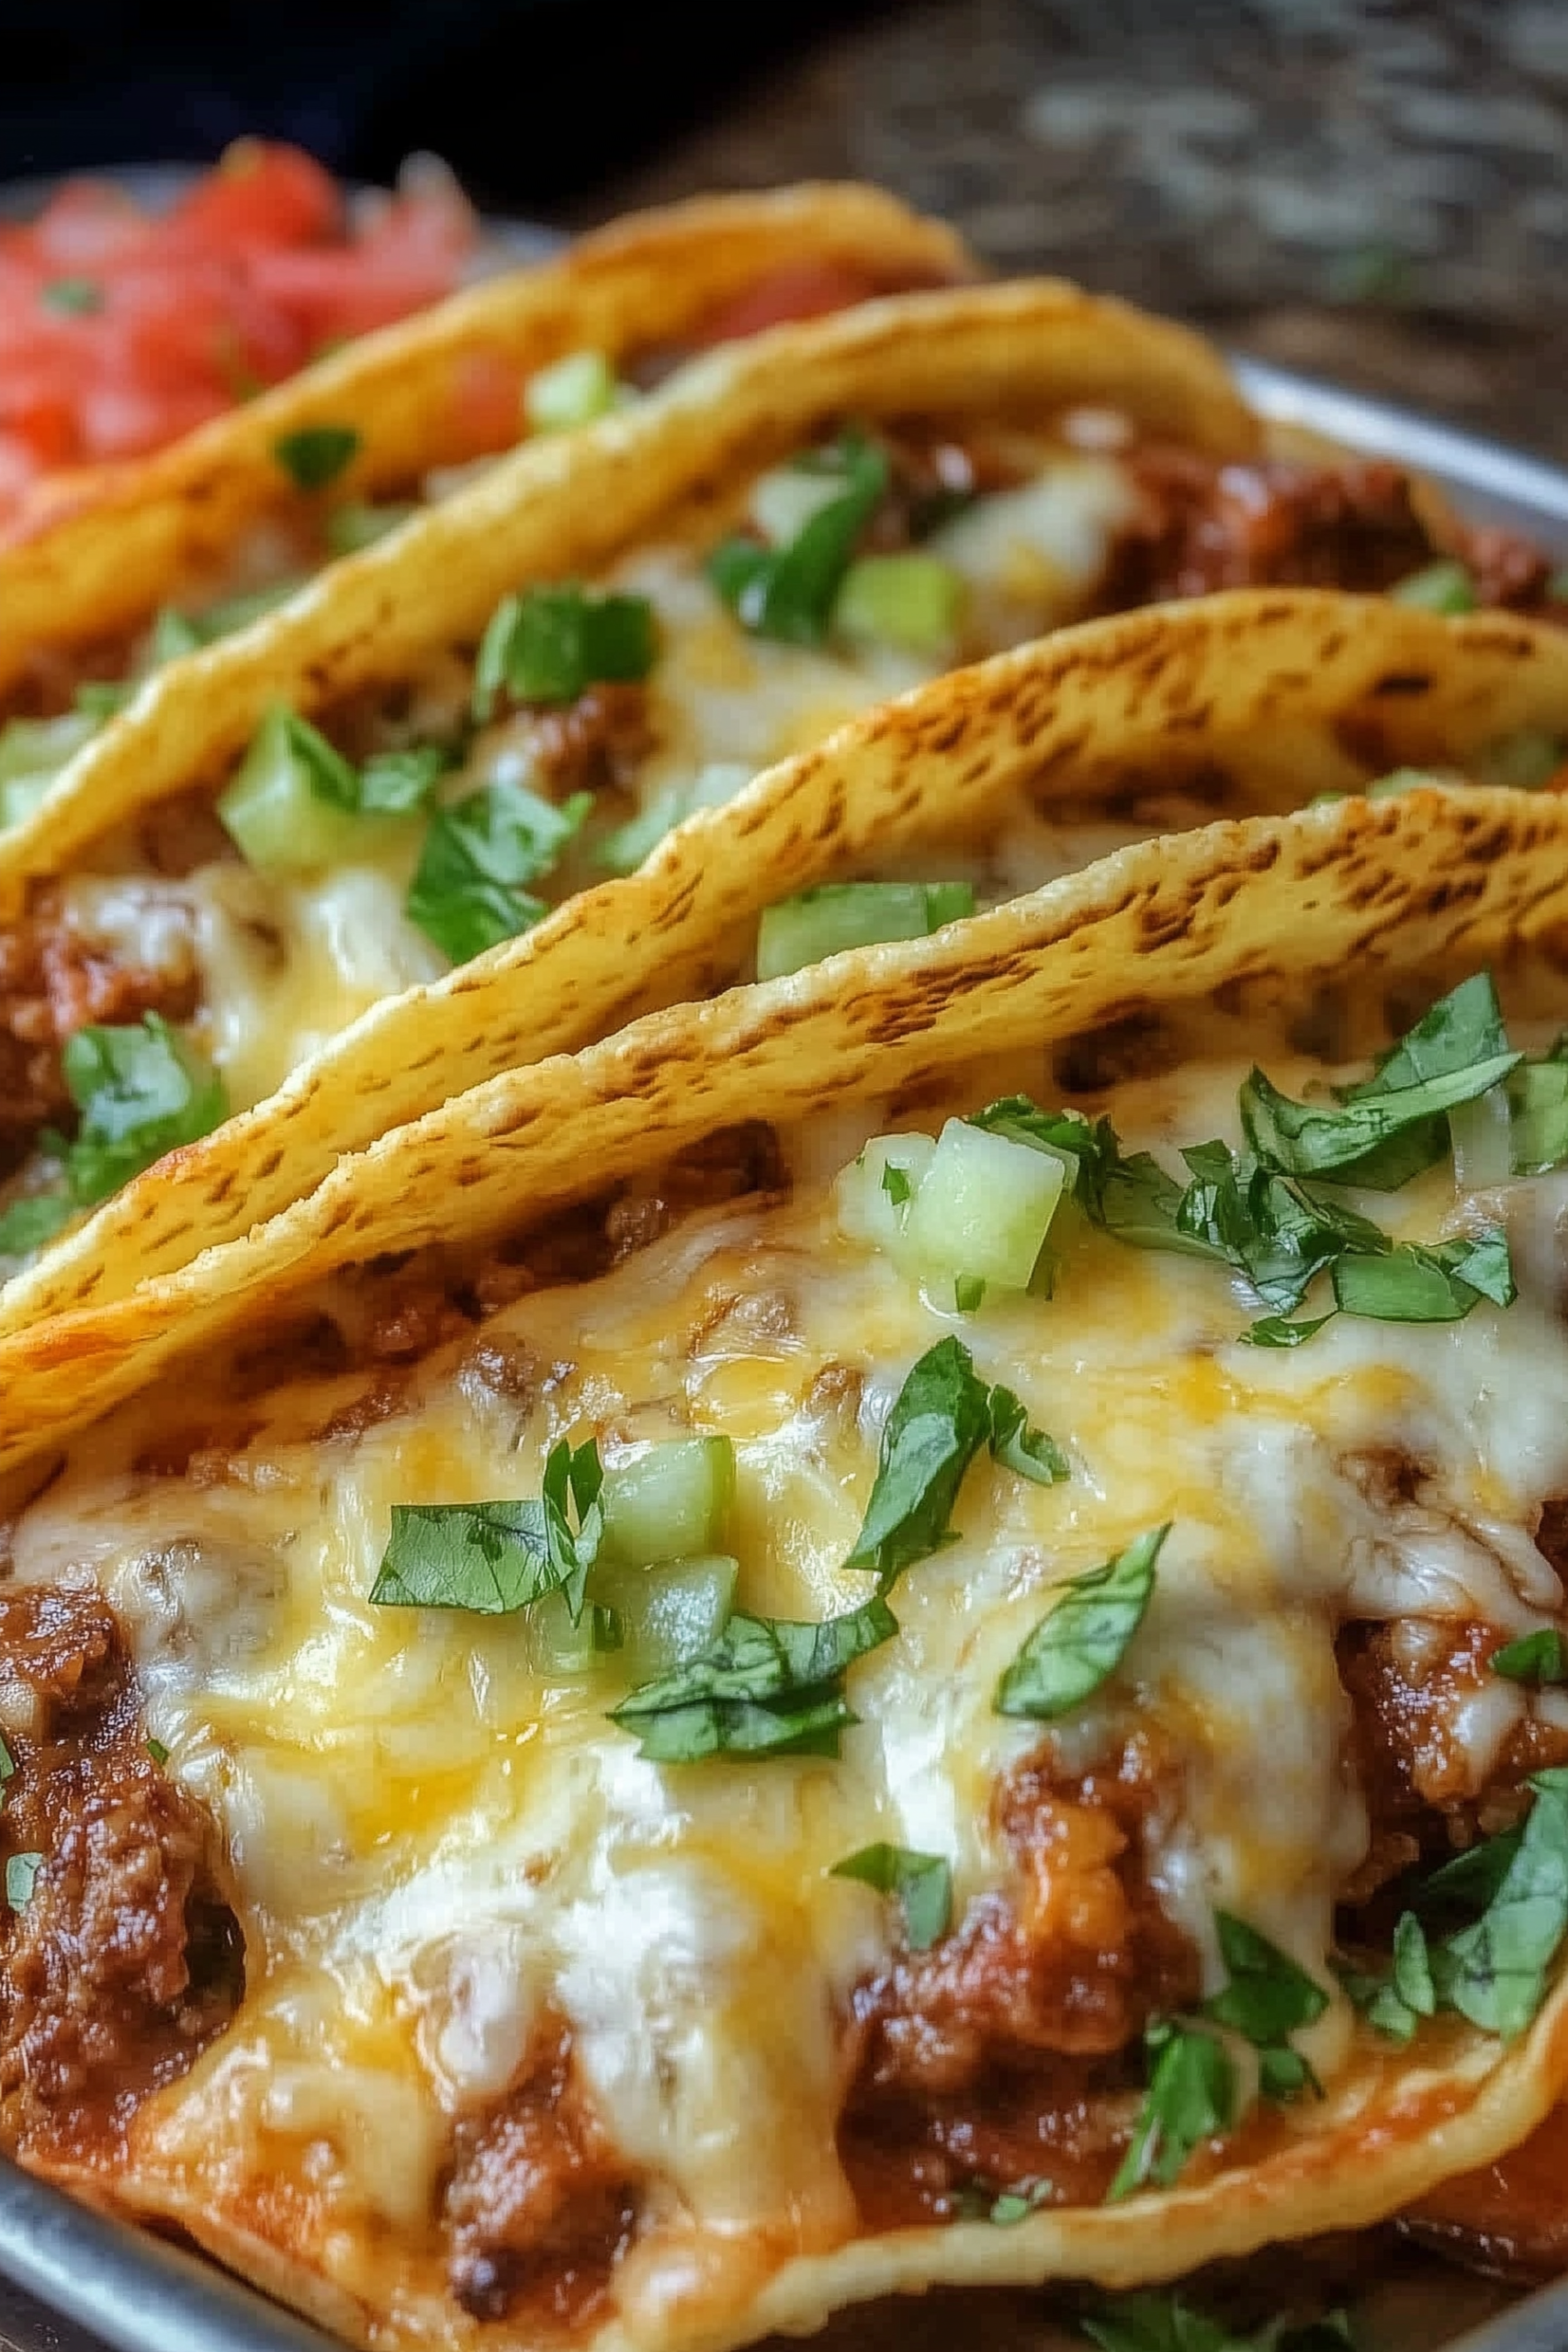
Nothing beats the sound of that first crunch when you pull a tray of these Oven-Baked Cheesy Tacos out of the oven. The edges of the tortillas get incredibly crispy, while the cheese melts down into the seasoned beef, creating a gooey, savory interior that standard tacos just can’t compete with. It’s the kind of meal that makes everyone rush to the kitchen the second the timer dings.
The magic happens in the oven. By baking the tacos upright, you allow the shells to toast evenly without them falling apart or becoming a soggy mess. The aroma of toasted corn and bubbling cheese fills the house, signaling that dinner is served. It’s a low-stress, high-reward meal that looks impressive on the tray but takes very little effort to assemble.
Why You’ll Love It
- Mass-Produced Crunch: Unlike frying individual shells, this method lets you crisp up a dozen tacos at once, ensuring everyone eats at the same time.
- No-Topple Design: Packing the shells tightly in a baking dish keeps them upright, meaning your fillings stay inside the taco and not on the plate.
- Fully Customizable: It’s the ultimate “clean out the fridge” meal; you can swap the protein or the cheese based on what you have on hand.
- Kid-Approved Texture: The combination of the melted “glue” (cheese) and the crunchy shell is a winner for even the pickiest eaters.
- Easy Cleanup: Since everything is contained in one baking dish, you aren’t dealing with multiple greasy pans or a messy countertop.
Ingredient Notes & Details
- Lean Ground Beef: I prefer using 90/10 lean ground beef so the tacos aren’t overly greasy. You can easily swap this for ground turkey or even plant-based crumbles.
- Hard Taco Shells: Look for “Stand ‘N Stuff” varieties if you want extra room for toppings, but standard shells work perfectly when nestled together.
- Mexican Blend Cheese: A mix of Monterey Jack and Cheddar melts beautifully. For a kick, use Pepper Jack to add a little heat.
- Refried Beans: Adding a thin layer of beans at the bottom of the shell acts as a moisture barrier, keeping the shell crispy while adding extra protein.
- Fresh Toppings: Diced red onions, Roma tomatoes, and cilantro add a bright, fresh contrast to the warm, baked components.
Step-by-Step Instructions
The secret to a perfect baked taco is the layering strategy. Start by browning your meat with a heavy dose of taco seasoning and a splash of water to keep it juicy. While the meat simmers, line your baking dish with the taco shells. I like to pre-toast the shells in the oven for about 3 minutes alone to ensure they stay rigid once the fillings are added.
Next, spread a small spoonful of warm refried beans at the base of each shell. This provides a sturdy foundation. Follow that with a generous scoop of the seasoned beef. Finally, drape the cheese over the top, making sure some of it touches the edges of the shell—this creates those sought-after crispy cheese “lace” edges. Bake at 400°F until the cheese is bubbling and slightly golden. The final step is all about the “cold” toppings. Add your lettuce, tomatoes, and onions only after the tray is out of the oven to maintain that fresh temperature contrast.
Expert Tips
- Dry the Meat: If your beef is too saucy, it will make the bottom of the shells soggy. Drain any excess fat thoroughly before filling.
- Warm the Shells: Five minutes in the oven before filling makes them less likely to crack when you’re stuffing them.
- The Cheese Seal: Putting a little cheese both under and over the meat helps “glue” the taco together.
- Use a High Rim: Use a 9×13 baking dish with high sides to keep the shells supported and upright.
- Don’t Overstuff: Leave about half an inch of space at the top for your fresh lettuce and salsa later.
Storage & Reheating
Tacos are best enjoyed fresh, but if you have leftovers, store the meat and shells separately if possible. If they are already assembled, wrap them in foil and store in the fridge for up to 2 days. To reheat, place them back in the oven or an air fryer at 350°F for 5 minutes. Avoid the microwave, as it will turn the shells soft and chewy.
Serving & FAQs
What should I serve with these? I love serving these with a side of cilantro lime rice or a simple street corn salad (Elote). A big bowl of homemade guacamole is also a must-have for dipping.
Can I make these ahead of time? You can prep the meat and chop the veggies a day in advance. However, don’t assemble and bake them until you are ready to eat, or the shells will lose their crunch.
📖 Recipe
Homemade Crispy Baked Tacos
Ingredients
- 12 hard taco shells
- 1 lb lean ground beef
- 1 packet 1 oz taco seasoning
- ½ cup water
- 1 cup refried beans warmed
- 2 cups shredded Mexican cheese blend
- 1 cup shredded iceberg lettuce
- 2 Roma tomatoes diced
- ¼ cup red onion finely chopped
- Fresh cilantro for garnish
Instructions
- Preheat your oven to 400°F (205°C).
- In a large skillet, brown the ground beef over medium-high heat until fully cooked. Drain excess fat.
- Stir in the taco seasoning and water. Simmer for 5 minutes until the liquid has reduced.
- Place taco shells upright in a 9×13 inch baking dish. Bake the empty shells for 3 minutes.
- Remove the dish and spread a thin layer of refried beans in the bottom of each shell.
- Top the beans with the seasoned beef, then sprinkle heavily with shredded cheese.
- Bake for 8-10 minutes, or until the cheese is melted and the shells are golden brown.
- Remove from the oven and top with shredded lettuce, tomatoes, onions, and cilantro. Serve immediately.


Leave a Reply