


Want to save this recipe?
Biting into a cool, crisp outer shell of smooth white chocolate to find an ultra-fudgy, velvety cookie center is the ultimate bite-sized indulgence. These three-ingredient Oreo truffles are a staple in my kitchen whenever my family craves a decadent treat but I do not want to turn on the oven. The contrast between the rich, dark cocoa center and the sweet white coating makes them look and taste like they came straight from a gourmet confectionery.
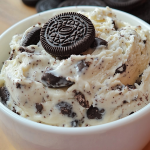
Whenever I set a platter of these down on the kitchen counter, they disappear in minutes. My kids love helping roll the dark cookie mixture into perfectly round spheres, while my husband always sneaks a few right out of the fridge before the chocolate coating even fully sets. As you can see in the image, finishing them with a simple sprinkle of crushed cookie crumbs creates an elegant, textured look that elevates this effortless treat into something truly special for parties, holidays, or simple weekend rewards.
Why You’ll Love It
- Only three ingredients: Requires just sandwich cookies, cream cheese, and melting chocolate, keeping your grocery list incredibly short and budget-friendly.
- Completely no-bake recipe: Keep your kitchen cool and skip the oven entirely, making this an ideal dessert to whip up during hot summer months.
- Perfect for little helpers: The simple process of crushing cookies and rolling the dough is an excellent, mess-friendly activity for kids to join in.
- Excellent make-ahead dessert: These truffles store beautifully in the refrigerator, allowing you to check dessert off your list days before hosting guests.
- Highly customizable treats: Easily swap the outer coating or the cookie flavors to match holiday themes, birthdays, or specific family flavor preferences.

Ingredient Notes & Details
Crafting these decadent truffles relies on just three basic components blending together to create a luxurious texture.
- Oreo cookies: Standard chocolate sandwich cookies provide the deep, nostalgic cocoa flavor and the essential structure for the truffle center.
- Cream cheese: Brick-style cream cheese acts as the binding agent, cutting through the intense cookie sweetness while adding a rich, tangy creaminess.
- White chocolate melting wafers: High-quality melting chocolate creates that smooth, snappy outer shell shown that seals the fudgy center inside.
Natural Substitutions: For a completely plant-based twist, use dairy-free cream cheese and vegan dark chocolate chunks for dipping the treats. If anyone in your family avoids gluten, certified gluten-free chocolate sandwich cookies swap into this recipe seamlessly without changing the final texture. To lighten the richness slightly, you can substitute traditional cream cheese with a lower-fat Neufchâtel cheese block.
Step-by-Step Instructions
We begin by pulverizing the entire package of chocolate sandwich cookies—creamy filling included—in a food processor until they transform into fine, sandy crumbs. Leaving the cream filling intact is essential because it adds sweetness and essential moisture to help bind the dough. Transfer the crumbs to a mixing bowl, reserving a small handful for decorating later, and add the softened cream cheese. Using a hand mixer or a sturdy spoon, blend them together until a dense, uniform, dark dough forms.
Next, scoop the mixture and roll it between your palms into tight, one-inch balls, placing them onto a parchment-lined baking sheet. Popping the rolled spheres into the freezer for about fifteen minutes is a critical step; chilling firms up the fats, preventing the truffles from melting or losing their shape when dipped into the warm chocolate. Melt your white chocolate wafers in a microwave-safe bowl in short intervals, stirring frequently to prevent burning. Dip each chilled truffle into the silky chocolate, let the excess drip away, and set them back on the parchment. Immediately sprinkle the reserved cookie crumbs over the tops before the shell hardens.
Expert Cooking Tips
- Soften the cream cheese: Cold cream cheese will create stubborn white lumps in your dark dough, so let it reach room temperature first.
- Use a cookie scoop: A small one-tablespoon trigger scoop ensures every single truffle is uniform in size and sets evenly.
- Keep them cold: Only take a few truffles out of the freezer at a time to dip, keeping the remaining spheres completely firm.
- Choose melting wafers: Baking chips contain stabilizers that resist smooth melting, so choose high-quality dipping wafers or chopped chocolate bars.
- Tap off excess chocolate: Gently tap your fork against the edge of the bowl after dipping to ensure a thin, elegant outer shell.
Storage & Reheating
Keep your truffles stored in an airtight container inside the refrigerator for up to two weeks. Because of the cream cheese base, they should not be left out at room temperature for more than two hours. They also freeze wonderfully for up to three months; just thaw them in the fridge overnight before serving. No reheating is required, as these are best enjoyed chilled!
Serving & FAQs
Serve these truffles chilled on a decorative platter alongside hot coffee, cold milk, or a dry red wine for an adult gathering.
Why is my chocolate coating clumping up? Chocolate clumps if even a single drop of water touches it or if it gets overheated. Ensure all bowls and utensils are completely dry before melting.
Can I use a blender instead of a food processor? Yes, a high-powered blender works perfectly. Just blend in short pulses so you do not turn the cookies into a greasy paste.
Homemade Oreo Truffles
Prep Time: 18 minutes
Chill Time: 23 minutes
Total Time: 41 minutes
Servings: 24 truffles
Ingredients
- 36 standard Oreo cookies (plus 2 extra, crushed for garnish)
- 8 oz brick-style cream cheese, softened to room temperature
- 16 oz high-quality white chocolate melting wafers
Instructions
- Place 36 cookies into a food processor and pulse until they are formed into fine crumbs.
- In a medium bowl, combine the cookie crumbs and softened cream cheese. Mix with a hand mixer until completely smooth and a thick dough forms.
- Line a large baking sheet with parchment paper. Roll the mixture into 1-inch balls and place them on the prepared sheet.
- Freeze the rolled balls for 23 minutes until completely firm.
- Melt the white chocolate melting wafers in a microwave-safe bowl in 30-second increments, stirring well between each session until totally smooth.
- Use a fork to dip each chilled ball into the melted chocolate, shaking off any excess. Return to the parchment paper and immediately top with a sprinkle of extra crushed cookie crumbs before the chocolate sets. Refrigerate for 10 minutes to harden before serving.

Leave a Reply